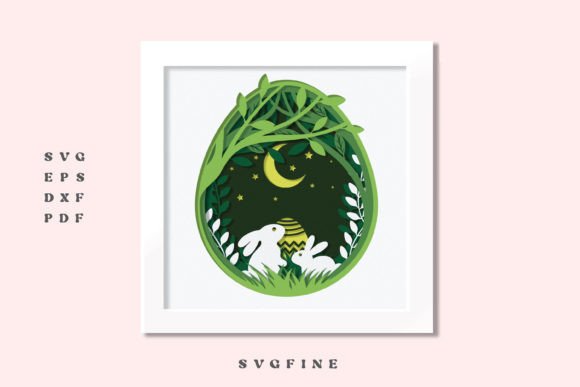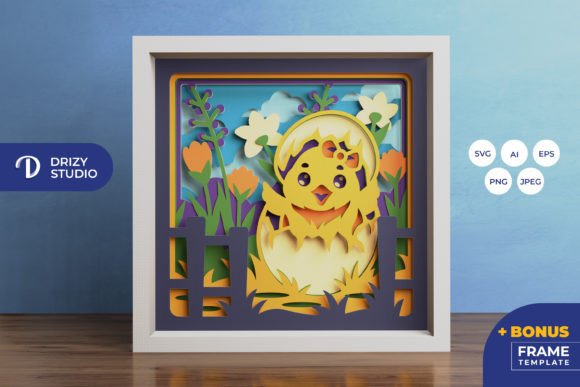
Creating Depth and Light: A Practical Guide to the Chick Hatching 3D Shadow Box
The resurgence of paper crafting as a meditative hobby has brought renewed attention to layered art forms. Among these, the Chick Hatching 3D Shadow Box stands out as a compelling project for both novice crafters and experienced designers. This specific design combines the tactile satisfaction of paper cutting with the visual intrigue of depth perception, resulting in a piece that is equally effective as a static wall decoration or an illuminated light box. For adults seeking a creative outlet that balances technical precision with artistic expression, understanding the mechanics and potential of this template is essential before beginning.
Understanding the Layered Construction
At its core, a 3D shadow box relies on the principle of parallax and layering. The Chick Hatching 3D Shadow Box template utilizes seven distinct layers to create a sense of three-dimensional space within a two-dimensional medium. Each layer is cut from paper or cardstock and spaced apart using foam tape or glue spacers. As light travels through these gaps, it casts subtle shadows that enhance the definition of the central motif—in this case, a chick emerging from an eggshell.
The technical specifications of this particular template are designed for versatility. With a square format of 20.32 x 20.32 cm (approximately 8 x 8 inches), it fits standard framing options readily available at craft stores. The inclusion of multiple file formats—AI, EPS, PNG, SVG, and JPEG—ensures compatibility with a wide range of tools. For those utilizing digital cutting machines like Silhouette or Cricut, the SVG file is particularly valuable. It allows for precise, automated cutting, which is crucial when dealing with intricate details such as feather textures or shell fragments. However, the availability of high-resolution PNG and JPEG files means that manual crafters using art knives and scissors are not excluded from the process.
Digital Cutting vs. Manual Crafting: Choosing Your Approach
One of the primary decisions a crafter must make is whether to use a digital cutting machine or traditional hand tools. Each approach offers distinct advantages and tradeoffs regarding time, cost, and aesthetic outcome.
- Digital Cutting (Cricut/Silhouette): Using the provided SVG file ensures uniformity and speed. The machine handles the intricate internal cuts that might be challenging to execute by hand. This method is ideal for producing multiple units or for individuals who prefer accuracy over the organic feel of hand-cut edges. However, it requires an initial investment in hardware and software familiarity.
- Manual Cutting: For those without access to cutting machines, the template’s PNG and JPEG previews serve as guides for hand cutting. This approach is more time-consuming and requires a steady hand and sharp art knives. The benefit lies in the unique, slightly irregular edges that can add a handmade charm to the final piece. It is also more accessible for beginners who wish to test the waters of paper crafting without significant equipment costs.
It is important to note that while the SVG file can be resized, maintaining the aspect ratio is critical. Distorting the proportions can misalign the layers, disrupting the visual coherence of the hatching chick motif. Whether cutting digitally or manually, precision in alignment during the assembly phase is paramount to achieving the intended 3D effect.
Static Display vs. Illuminated Light Box
The versatility of the Chick Hatching 3D Shadow Box extends beyond its construction method to its final presentation. Crafters typically choose between two display styles: a traditional framed shadow box or an illuminated light box. This decision significantly impacts the materials required and the visual impact of the finished product.
The Framed Wall Decoration
When used as a static piece, the shadow box relies on ambient lighting to create depth. The shadows cast by the seven layers are softer and more subtle. This option is best suited for well-lit rooms where natural or overhead light can accentuate the layers. It serves as a elegant, understated decoration that complements minimalist or rustic interior design styles. The focus here is on the texture of the paper and the intricacy of the cuts.
The Illuminated Light Box
Adding LED strip lights between the layers transforms the project into a luminous art piece. The light source, typically placed at the back or between specific layers, highlights the translucency of the paper and creates dramatic contrasts. This approach is particularly effective for the Easter theme, as the warm glow can evoke a sense of warmth and renewal. However, building a light box requires additional considerations:
- Power Source: You must plan for battery packs or USB connections, ensuring they are concealed within the frame.
- Paper Opacity: Thinner paper allows more light to pass through, creating a softer glow, while thicker cardstock provides sharper silhouettes. Experimenting with different paper weights can yield varied effects.
- Heat Management: While LEDs generate minimal heat, ensuring adequate ventilation within the enclosed frame is a prudent safety measure.
Evaluating Material Choices and Color Variations
The template provides the structure, but the choice of paper determines the aesthetic tone. The preview images often showcase specific color palettes, but the final product may vary based on lighting and paper selection. This variability is not a limitation but an opportunity for customization.
For a realistic look, crafters might opt for textured cardstocks in earthy tones—creams, soft yellows, and muted browns—to mimic the natural colors of a chick and eggshell. Alternatively, a monochromatic scheme using varying shades of white or pastel blue can create a modern, ethereal appearance. When selecting paper, consider the grain direction and thickness. Paper that is too thin may warp when glued, while paper that is too thick may obscure fine details when layered.
It is also worth noting that the adhesive method affects the final look. Double-sided foam tape is commonly used to create the necessary spacing between layers. The thickness of the tape (usually 1mm to 3mm) will determine the depth of the shadow box. Thicker tape creates deeper shadows and a more pronounced 3D effect, but it also requires a deeper frame to accommodate the bulk.
Is This Project Right for You?
Deciding whether the Chick Hatching 3D Shadow Box is the appropriate project depends on your skill level, available time, and intended use. This template is well-suited for:
- Intermediate Crafters: Those who have experience with layering and framing but want a guided design to reduce planning time.
- Gift Makers: The personalized nature of handmade items makes this an excellent choice for Easter gifts, baby showers, or spring-themed home decor.
- Lighting Enthusiasts: Individuals interested in experimenting with DIY lighting projects will find the light box variation particularly rewarding.
However, it may not be the best fit for absolute beginners who have never handled an art knife or assembled a frame. The precision required for aligning seven layers can be frustrating without prior experience. In such cases, starting with a simpler, three-layer template might be a more prudent first step.
Furthermore, if you are looking for a quick, instant decoration, this project requires patience. The cutting process, even with a machine, involves weeding small pieces, and the assembly demands careful alignment. It is a project meant to be enjoyed as a process, not just a means to an end.
Final Considerations for Assembly
Successful assembly of the Chick Hatching 3D Shadow Box hinges on preparation. Before gluing any layers, lay them out in order to verify the sequence. Dry-fit the layers within the frame to ensure they sit flush and that the spacing is consistent. If creating a light box, test the LED placement before sealing the frame to avoid having to reopen it later.
Remember that the images provided in the product preview are for illustrative purposes. The actual color and texture of your final piece will depend on your material choices and lighting conditions. Embrace this variability as part of the creative process. By carefully selecting papers, choosing the right cutting method, and deciding on the optimal display style, you can transform a digital template into a unique, tangible work of art that captures the essence of spring and renewal.