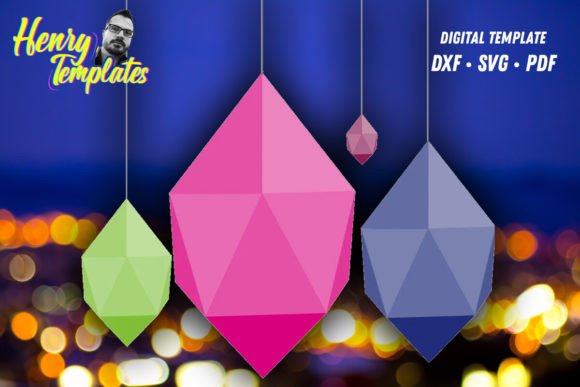
Mastering the 3D Jewel Template for Cut Out: A Guide to Bespoke Paper Decor
In the evolving landscape of event design and interior styling, the demand for personalized, high-impact decor has never been greater. Creators and hobbyists are increasingly turning away from mass-produced plastic ornaments in favor of handcrafted elements that offer texture, depth, and a distinct sense of occasion. At the forefront of this movement is the 3D Jewel Template for Cut out, a versatile digital design asset that allows users to introduce a dazzle of shimmer with bespoke, jewel-shaped objects. Whether you are a professional event planner looking to elevate a wedding reception or a DIY enthusiast aiming to add a touch of luxury to your home, understanding how to leverage this template can transform simple materials into striking visual statements.
The Allure of Dimensional Paper Craft
The concept behind the 3D jewel is rooted in the interplay of light and geometry. Unlike flat cutouts, these three-dimensional structures catch ambient light from multiple angles, creating dynamic shadows and highlights that mimic the faceted appearance of genuine gemstones. This optical effect is achieved through precise folding lines and interlocking tabs included in the template design. When assembled, the result is a lightweight yet substantial object that commands attention without the heaviness or cost of glass or crystal.
Using a 3D Jewel Template for Cut out provides a structured foundation for creativity. It removes the guesswork from geometric construction, ensuring that each facet aligns perfectly. This precision is crucial for achieving the polished look associated with high-end decor. The template serves as a blueprint, allowing creators to focus on material selection and color theory rather than struggling with complex measurements. This accessibility makes it an ideal project for both novice crafters and experienced designers who value efficiency and consistency.
Versatile Applications in Event and Interior Design
One of the most compelling aspects of this design is its adaptability. The scale of the final product can be adjusted by modifying the print size, making it suitable for a wide range of applications. Here are several ways to incorporate these shimmering accents into your projects:
- Ceiling Installations: Dangle the finished jewels from a lofty ceiling using transparent fishing line or metallic thread. When suspended at varying heights, they create a cascading canopy effect that adds vertical interest to large venues such as banquet halls or atriums. This technique is particularly effective for weddings, galas, or corporate events where a sense of grandeur is desired.
- Tabletop Centerpieces: Incorporate smaller versions into your tabletop decor. They can be scattered among floral arrangements, placed atop gift boxes, or used as place card holders. The reflective surfaces complement candlelight, enhancing the intimate atmosphere of dinner parties.
- Background Enhancements: Use the jewels as an alluring enhancement for your background setting. Attach them to a backdrop wall in a gradient pattern to create a textured photo booth area. This adds depth to photographs and provides a sophisticated alternative to traditional fabric drapes or paper flowers.
The versatility extends beyond temporary events. These decorative pieces can be integrated into permanent interior design schemes, such as mobile installations in nurseries, accent pieces in modern living rooms, or window displays for retail environments. The key is to consider the spatial context and adjust the density and size of the jewels accordingly.
Material Selection and Customization
The visual impact of the 3D Jewel Template for Cut out is heavily influenced by the materials chosen. This versatile design can be seared out in a color that resonates with you, allowing you to choose the texture and cardboard according to your personal taste. The choice of substrate determines not only the aesthetic but also the structural integrity of the final piece.
Cardstock Weight and Texture: For optimal results, use cardstock ranging from 65lb to 110lb cover weight. Lighter papers may lack the rigidity needed to hold the 3D shape, while excessively heavy board can be difficult to fold cleanly. Textured papers, such as linen or felt-finish cardstocks, add a tactile dimension that enhances the luxury feel. Metallic or pearlescent finishes are particularly effective, as they naturally reflect light, amplifying the jewel-like quality of the design.
Color Psychology: Color selection should align with the mood of the event or space. Deep emerald greens and royal blues evoke sophistication and calm, while golds and silvers introduce glamour and festivity. Pastel shades offer a softer, more whimsical appeal, suitable for baby showers or spring-themed gatherings. Consider using ombré effects by printing the same template in gradually shifting shades to create a visually cohesive installation.
Technical Compatibility and File Formats
To ensure a seamless crafting experience, it is essential to use the correct file format for your specific cutting machine or method. The 3D Jewel Template for Cut out is typically available in multiple formats to accommodate various tools and skill levels.
- SVG (Scalable Vector Graphics): This format is perfect for seamless use with Cricut cutters and other digital die-cutting machines. SVG files retain their quality at any size, ensuring crisp cut lines regardless of scaling. They also preserve layer information, which can be useful if the design includes separate components for assembly.
- DXF (Drawing Exchange Format): This is an excellent fit for Silhouette Studio users. DXF files are widely supported by professional-grade cutting plotters and provide precise vector data for clean cuts. They are ideal for users who require detailed control over cut settings and node editing.
- PDF (Portable Document Format): For those who appreciate the charm of hand-cut designs, PDF files offer a reliable solution. These can be printed on standard home printers and cut manually using craft knives and rulers. PDFs are also useful for previewing the design layout before committing to expensive materials.
Understanding these formats allows creators to choose the workflow that best suits their equipment and expertise. Digital cutting offers speed and precision, making it ideal for large-scale productions, while hand-cutting provides a meditative, artisanal approach suitable for small batches or unique variations.
Assembly Techniques for Professional Results
Once the pieces are cut, proper assembly is crucial to achieving the desired 3D effect. Start by pre-folding all score lines using a bone folder or a blunt tool. This step ensures sharp, clean edges and prevents the paper from cracking during assembly. Apply adhesive sparingly to the designated tabs; too much glue can cause warping or visible residue. Quick-drying tacky glue or double-sided tape works well for most cardstocks.
Assemble the jewels by connecting the tabs in a logical sequence, usually starting from the base and working upwards. Hold each joint in place for a few seconds to allow the adhesive to set. For added durability, consider reinforcing internal joints with small strips of tape. If hanging the jewels, attach the suspension thread before closing the final flap to ensure it is securely anchored within the structure.
Conclusion
The 3D Jewel Template for Cut out represents a fusion of digital precision and artistic expression. By leveraging this tool, creators can produce high-quality, customizable decor that rivals professional installations. Whether used for a one-time event or as part of a broader design strategy, these jewel-shaped objects offer a cost-effective way to introduce elegance and visual interest. With the right materials, tools, and techniques, anyone can master this craft and create stunning pieces that captivate and inspire. This striking design is destined to be the cynosure of your next glamour-soaked event, proving that with the right resources, luxury is accessible to all.